
 Русский
 Español
 中文
中文
Custom conversions in BeMob refer to different event types: registration, purchase, signup, download etc.
This feature helps to register different types of conversions and provides you with more details on 2 main questions:
- how well your traffic is performing
- what types of customers or clients are taking additional actions and thereby increase your income
Let’s dig deeper and get into the details of setting up and managing custom events.
The Use of Custom Conversions
A custom conversion is a specific event type registered on the side of your affiliate network or your own offer. It can be considered as an upsell that comes along with a main conversion.
For instance, you are running a campaign with an online casino / gambling offer. There could be several different event types associated with such offers: registration, first-time deposit, returned deposit, spending a certain amount etc.
It is more convenient to track these actions as separate custom events than statuses of the same conversion. And as a solution, custom conversions option will be helpful.
The Custom Conversions option is available on Professional, Business and Enterprise plans. You can also purchase this feature as an add-on on any pricing plan. More details see on our pricing page.
Let’s see how to create a custom conversion event with BeMob.
Custom Conversions Settings
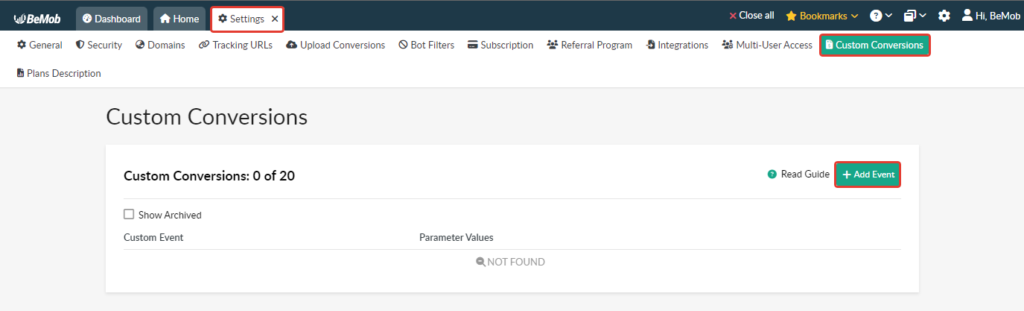
If the Custom Conversions option is available on your pricing plan or you purchased it as an add-on, you can create a custom event in your BeMob account. To do this you should perform the following steps:
- Log into your BeMob account.
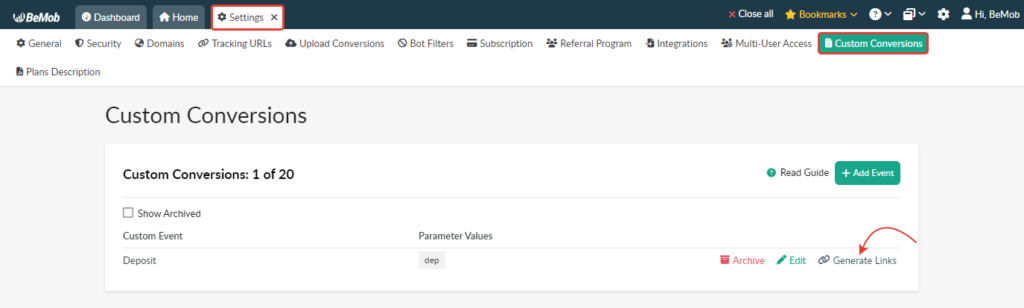
- Go to Settings → Custom Conversions.
- Press Add Event button.
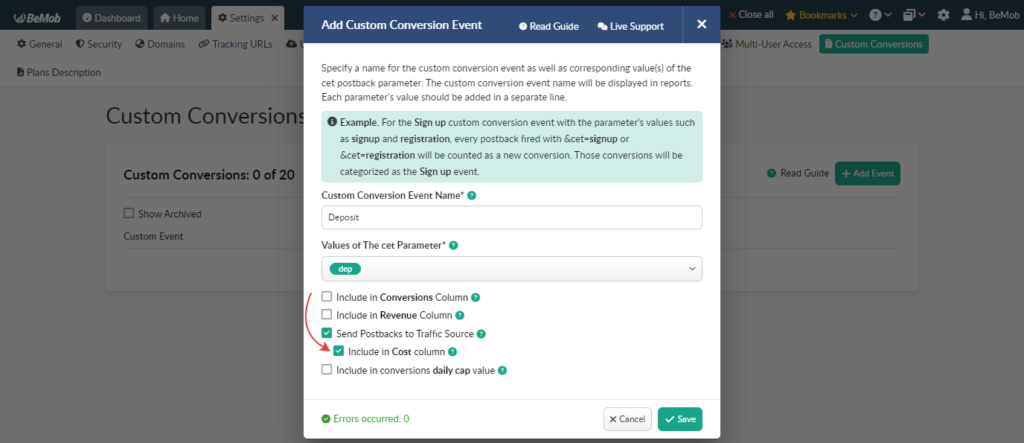
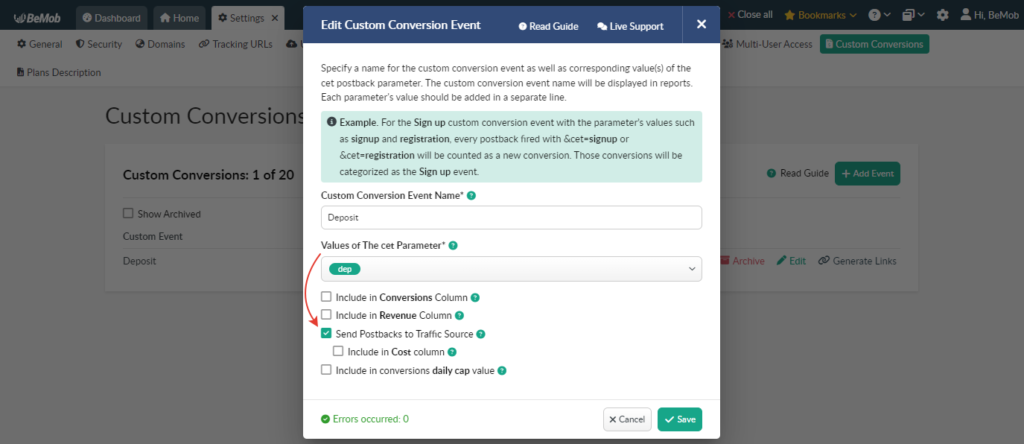
The following settings are available in the Custom Conversion Event window:
- Custom Conversion Event Name
This field refers to a custom event name which will be used as the name of the corresponding column displayed in your reports.
Custom Conversion Event Name should start from a letter and have the max 255 length.
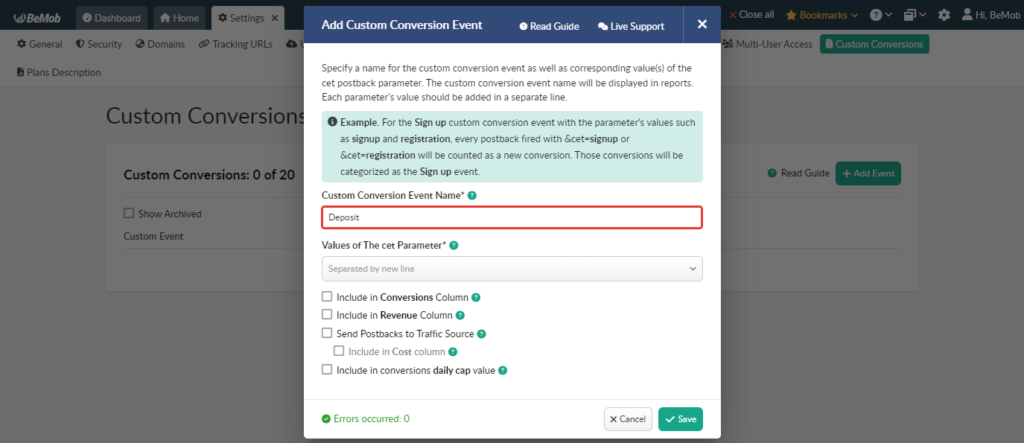

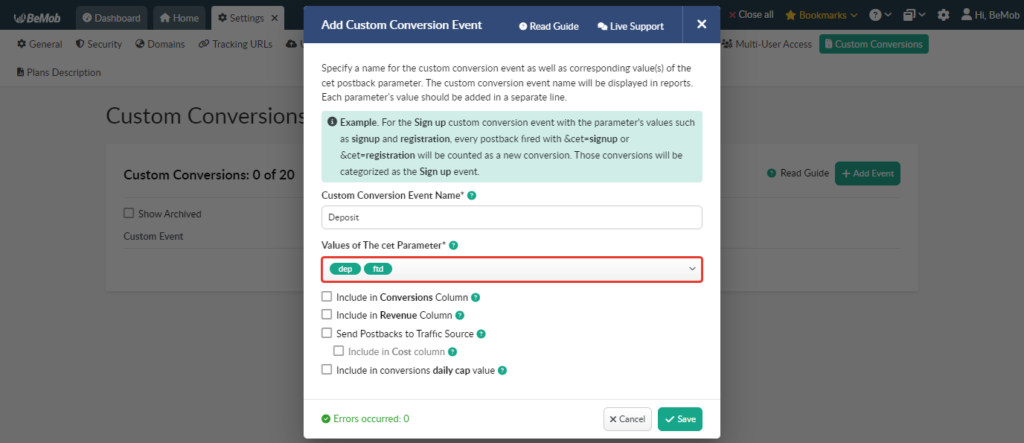
- Values of The cet Parameter
cet is the BeMob parameter used in Postback URL / Conversion Pixel to pass the value of a custom event.
For instance, https://xxxxx.bemobtrk.com/postback?cet=dep&cid={s2}&payout={payout}
Here you should specify a value of a conversion event supported by your affiliate network or your own value if you are going to track conversions from your own website.
Values of The cet Parameter should be a unique value with 255 alpha-numeric characters max and “-”, “_” allowed.

Tip: If there are a few custom events passed under the same affiliate network, specify several values in the Values of The cet Parameter field.
- Include in Conversions Column
If you want custom conversions to be included in the conversion amount and be displayed in the Conversions (All) column, the Include in Conversions Column checkbox should be marked.
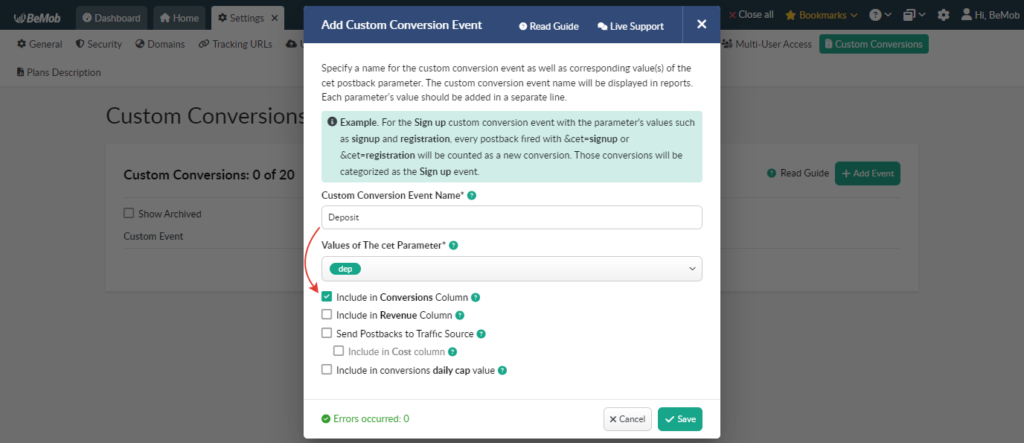
If this option is selected, a custom event will be included in the Conversions (All) column.

If this option is not selected, a custom event will be only displayed in the corresponding Event column automatically created by BeMob for this custom conversion.

- Include in Revenue Column
If you want the revenue of custom conversions to be included in the total revenue amount, the Include in Revenue Column checkbox should be marked.

If this option is selected, a revenue value of a custom event will be included in the Revenue column.

If this option is not selected, a revenue value of a custom event will be only displayed in the corresponding Event (Revenue) column automatically created by BeMob for this custom conversion.

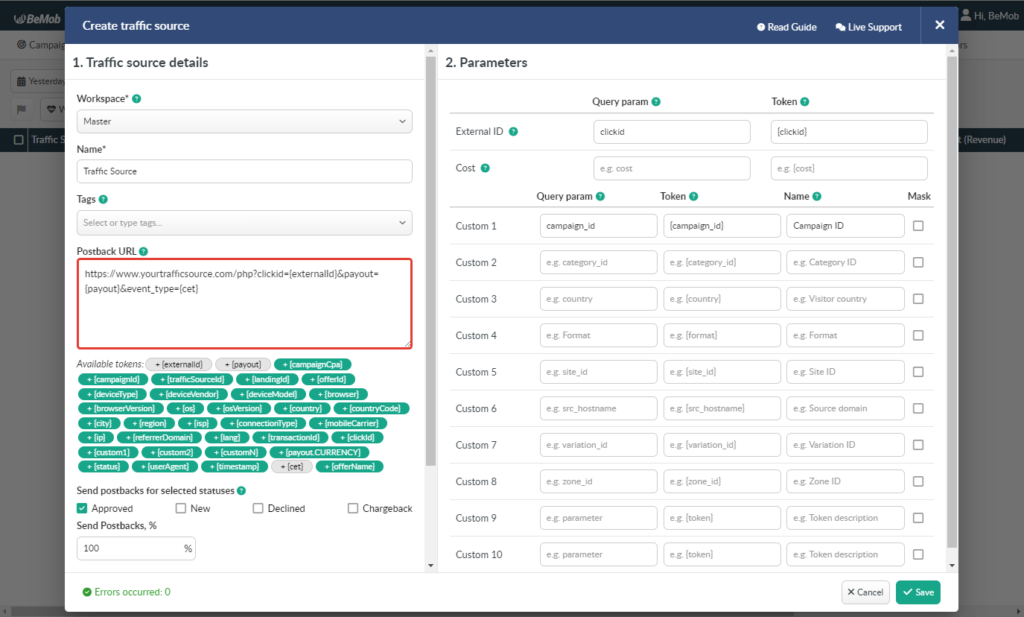
- Send Postbacks to Traffic Source
If you want to send data of custom conversions to your traffic source in its Postback URL, the Send Postbacks to Traffic Source checkbox should be marked.

After that it is required to specify a parameter that is supported by your traffic source for passing the value of a custom event in the Postback URL.
For instance, https://www.yourtrafficsource.com/php?clickid={externalId}&payout={payout}&event_type={cet}
where event_type is a parameter supported by your traffic source to accept the data of a conversion type;
{cet} is a token supported by BeMob for passing the value of a custom conversion event.
Tip: Contact your traffic source support or check its documentation to learn what parameter is used by this traffic source to receive data of a conversion type in Postback URL.

Once a postback is sent to your traffic source, {cet} will be replaced with the actual value of a custom event.

- Include in Cost column
You are able to use this option only if Send Postbacks to Traffic Source is selected.
If you want the cost of custom conversions to be included in the total cost amount, the Include in Cost Column checkbox should be marked.
Tip: Use the Include in Cost Column option if you are working on a CPA basis with your traffic source.
- Include in conversions daily cap value
If you want the custom conversions to be included in a daily cap amount specified on the offer’s level, the Include in conversions daily cap value checkbox should be marked.
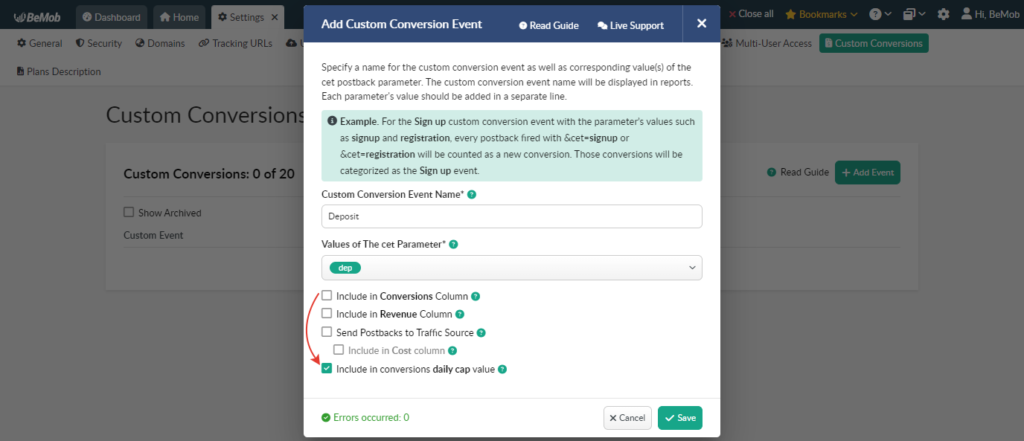
Tip: Use the Include in conversions daily cap value option to avoid a traffic loss after the daily limit on custom conversions is reached on the side of your affiliate network.
More details on the Daily Cap option can be found in the dedicated guide.
Custom Conversions Tracking
Postback URL
Custom conversions can be tracked via Postback URL that contains cet parameter and a custom event value.
To generate a Postback URL for custom conversions tracking you should perform the following steps:
- go to Settings → Custom Conversions;
- press the Generate Links button.
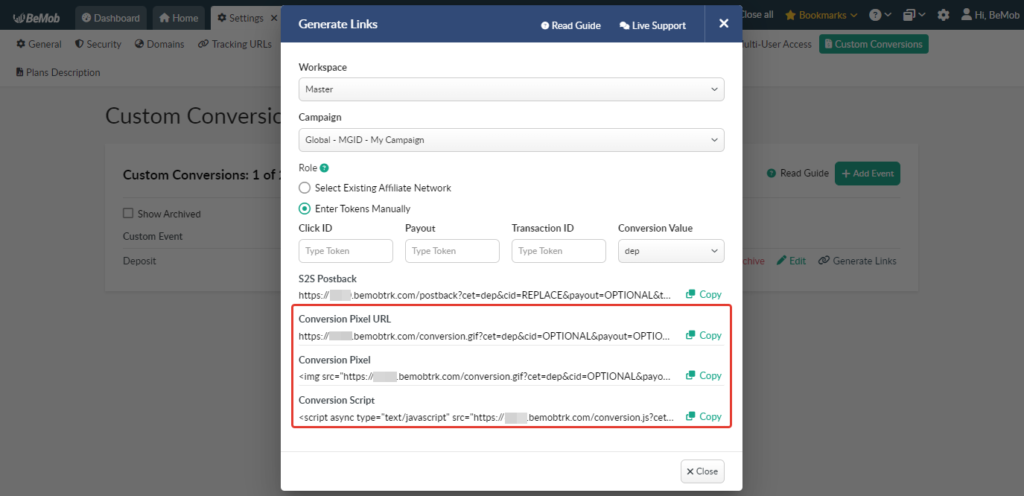
The following settings are available in the Generate Links window:
- Workspace
Select the workspace you are working with. If you are not working with Workspaces, leave the default Master option.
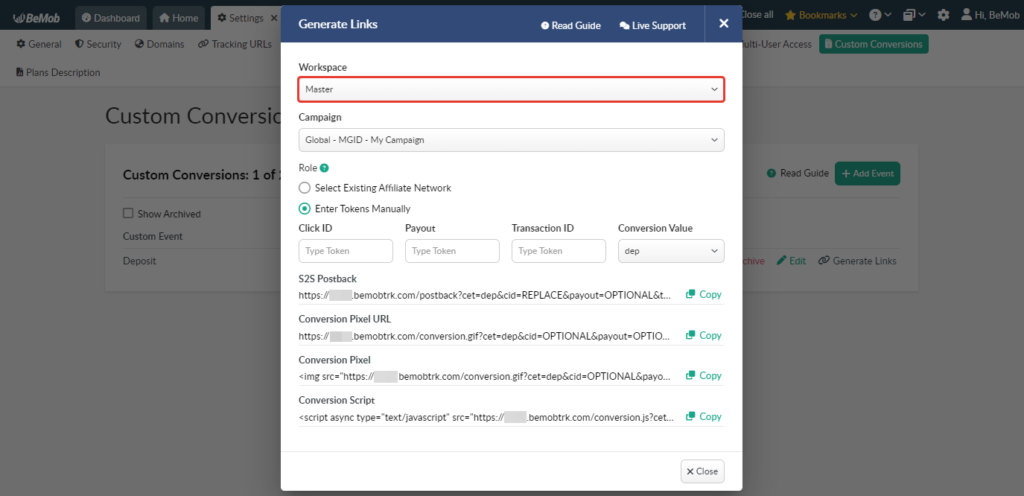
- Campaign
Select a campaign you want to use the Custom Conversions option for.
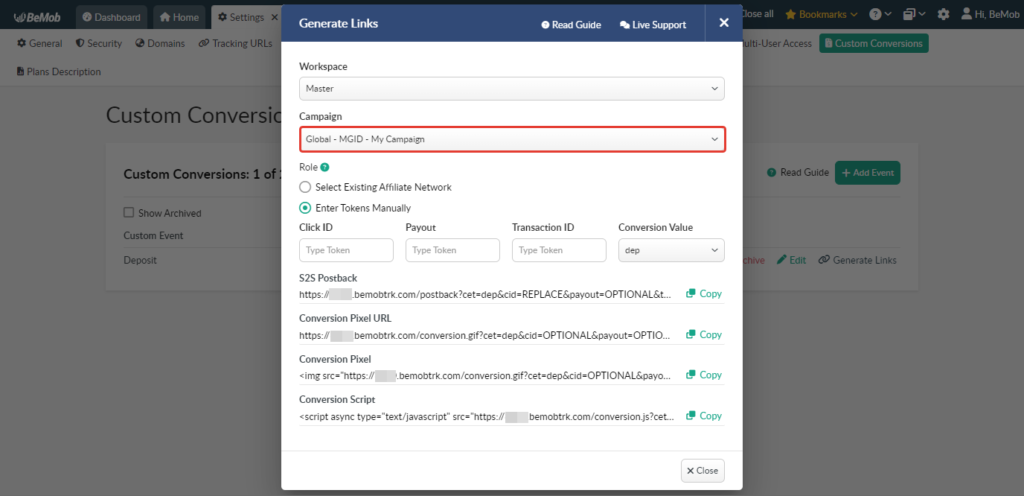
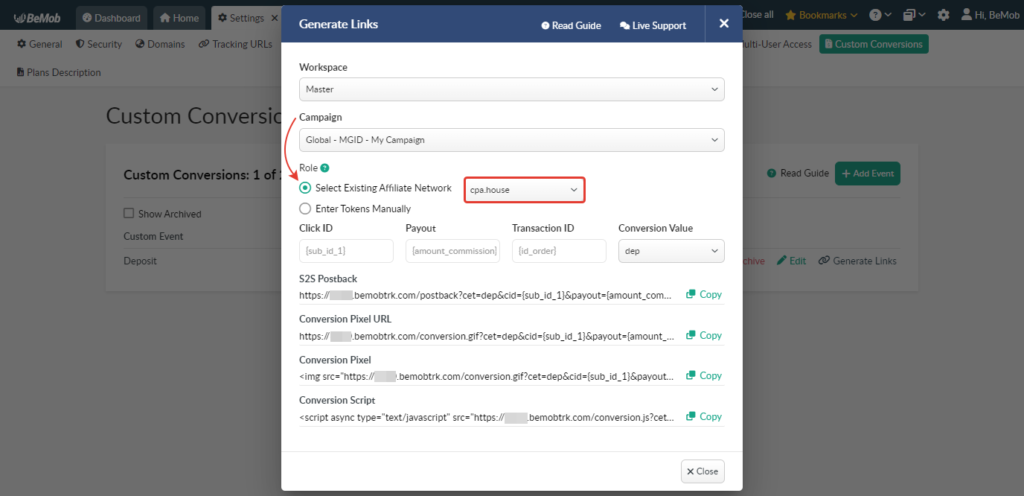
- Role
Choose Select Existing Affiliate Network option if you have already added your affiliate network from BeMob templates. The postback tokens of the selected affiliate network will be automatically available in the Postback URL.
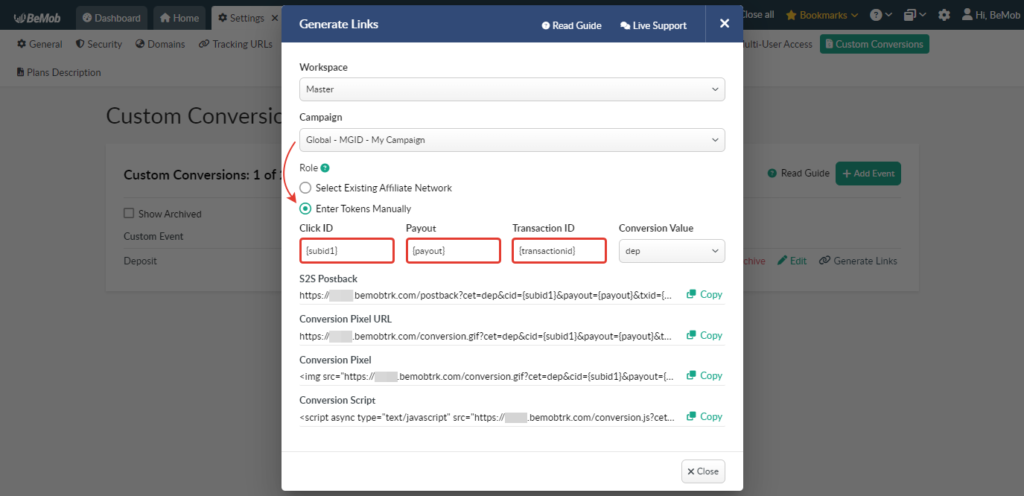
If we don’t have your affiliate network in our pre-configured templates, select Enter Tokens Manually and specify the tokens supported by your affiliate network.
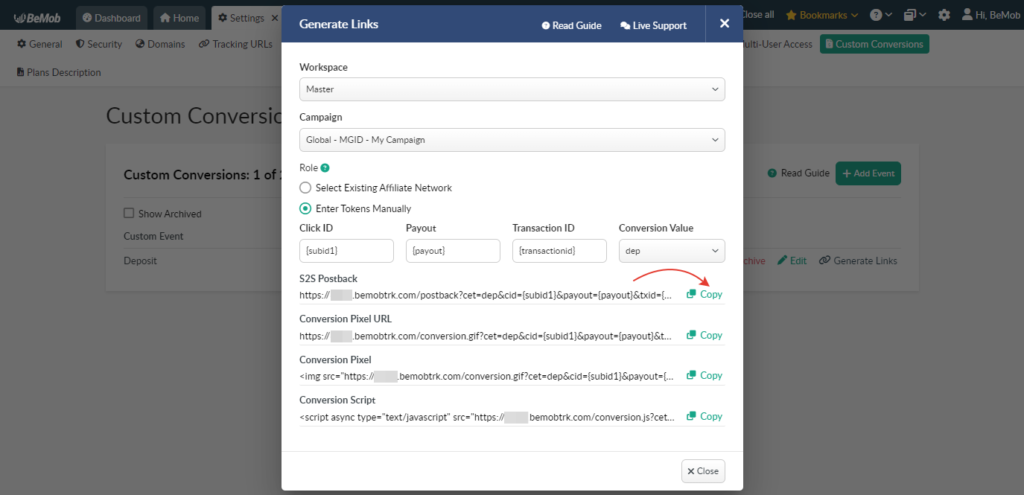
Press the Copy button to get the configured Postback URL.
Conversion Pixel
If it is not possible to track custom conversions from your affiliate network via Postback URL or you want to track custom conversions associated with your own offer, you can use Conversion Pixel.
To generate a Postback URL for custom conversions tracking you should perform the following steps:
- go to Settings → Custom Conversions;
- press the Generate Links button.
The Conversion Pixel is provided in 3 forms: URL, pixel and script. Copy the required type of Conversion Pixel from the Generate Links window.
Set the Conversion Pixel on the side of your affiliate network or inside the code of the ‘thank you page’ that follows your own offer.
Tip 1: Specify payout and transaction ID values in the pixel itself if this data is the same for each custom conversion.
For instance, <img src=”https://yourdomain.com/conversion.gif?cet=reg&cid=OPTIONAL&payout=2&txid=123456” width=”1″ height=”1″ border=”0″ alt=”” />
Tip 2: Use HTTPS Campaign URL on the side of your traffic source to be able to track custom conversions via pixel.
More information about the Conversion Pixel option see in our dedicated guide.
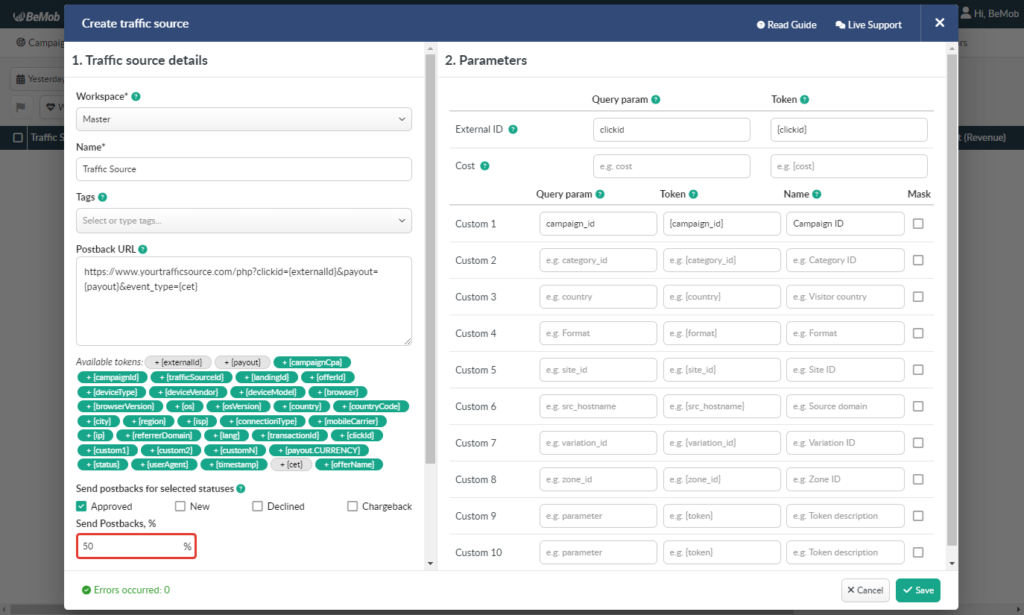
Send Postbacks, % Option x Custom Conversions
The Send Postbacks, % option is used to pass a certain percentage of conversions from BeMob to your traffic source. This feature works for both regular and custom conversions.
Tip: Make sure that Postback URL is supported by your traffic source and set in a traffic source template before using this option.
To set a percentage of conversions you want to send to a particular traffic source you should access the required traffic source settings. Provide the desired value in the corresponding field.
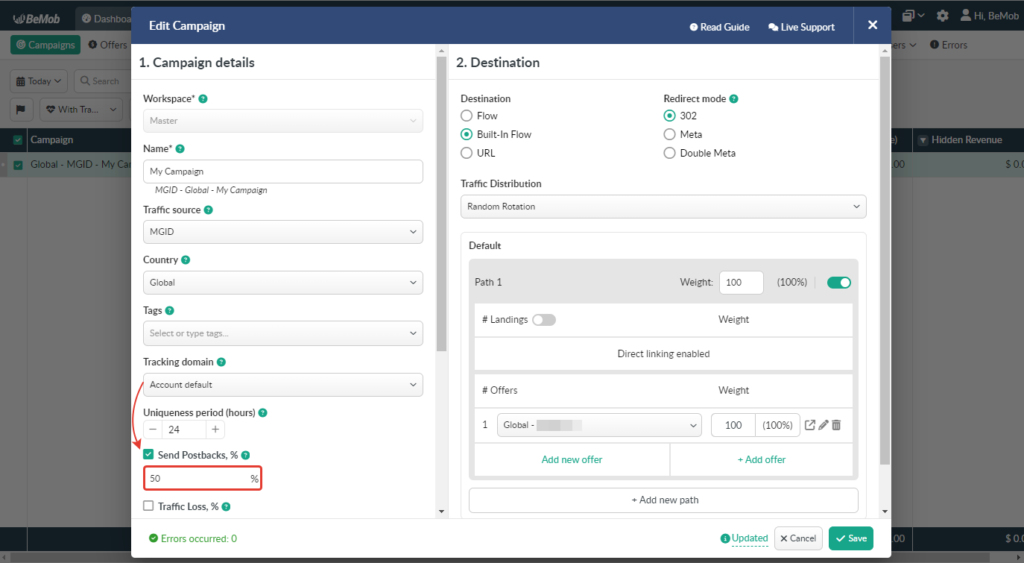
To set a percentage of conversions you want to send under a certain campaign you should access the required campaign settings. Provide the desired value in the corresponding field.
Read more about the Send Postbacks, % option in our guide.
The amount of sent conversions (both regular and custom) will be displayed in the Conversions (Sent) column.

The revenue of custom conversions which were not sent to a traffic source will be available in the Custom Event Name (Hidden Revenue) column.

Tip: Use the Columns Settings to add the columns associated with custom conversions tracking since they are not presented in the reports by default.

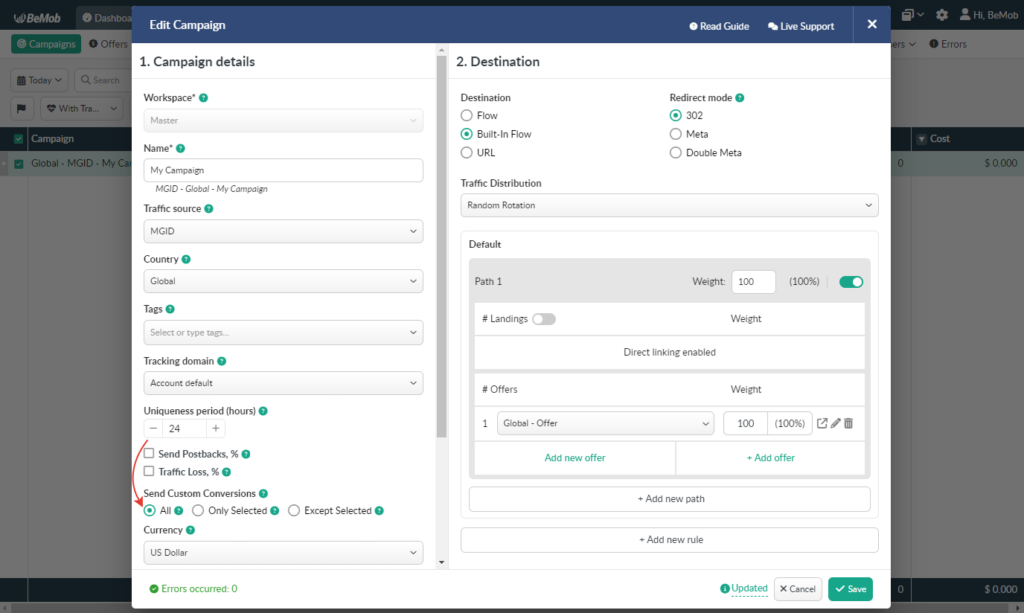
Send Custom Conversions Option
By default, all custom conversions are passed to your traffic source. The Send Custom Conversions feature allows you to manage custom conversions passing to your traffic source.
Tip: Make sure that the Send Postbacks to Traffic Source option is selected in the custom event settings.
There are three options available under the Send Custom Conversions option:
- All
This option should be selected if you want all custom conversion events to be sent to your traffic source.
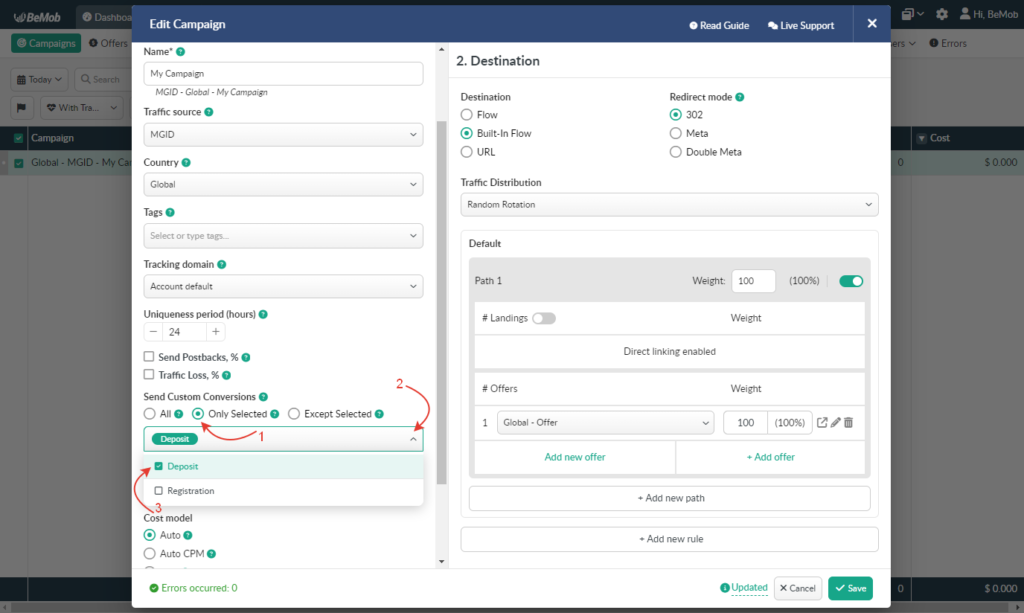
- Only Selected
This option should be selected if you want certain custom conversion events to be sent to your traffic source.
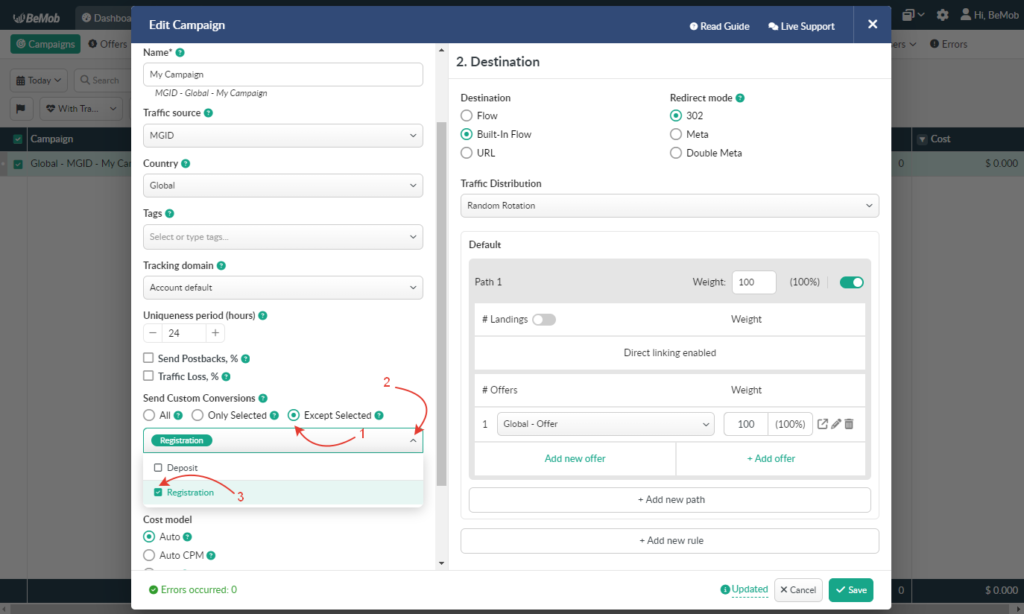
- Except Selected
This option should be selected if you don’t want certain custom conversion events to be sent to your traffic source.
Learn more about the Send Custom Conversions option in the dedicated guide.
The Difference Between Conversion Statuses and Custom Conversions
A conversion status and a custom conversion should be considered as completely different notions.
A conversion status is a status of the same type of a conversion.
For instance, you are working with a nutra offer. It means that you will be paid if a certain visitor purchases a promoted product.
There could be several statuses of a conversion:
- processing – a new conversion which has not been approved yet;
- approved – a confirmed conversion you will be paid for;
- rejected – a cancelled conversion you will not be paid for;
- trash – a fraud conversion which cannot be approved.
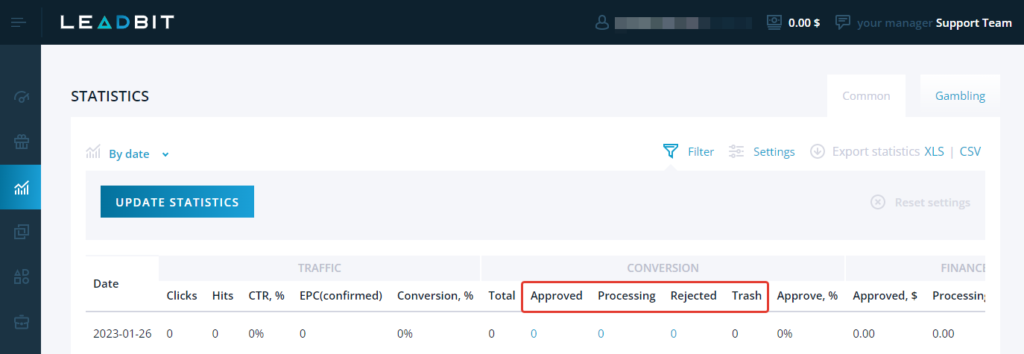
As you can see, a conversion event is still the same – purchase.
A custom conversion is a separate conversion event.
For instance, you are working with a gambling offer.
There could be several different event types:
- registration – a visitor’s signup conversion event;
- first-time deposit – a visitor’s first-time deposit conversion event;
- returned deposit – a visitor’s repeated deposit conversion event.
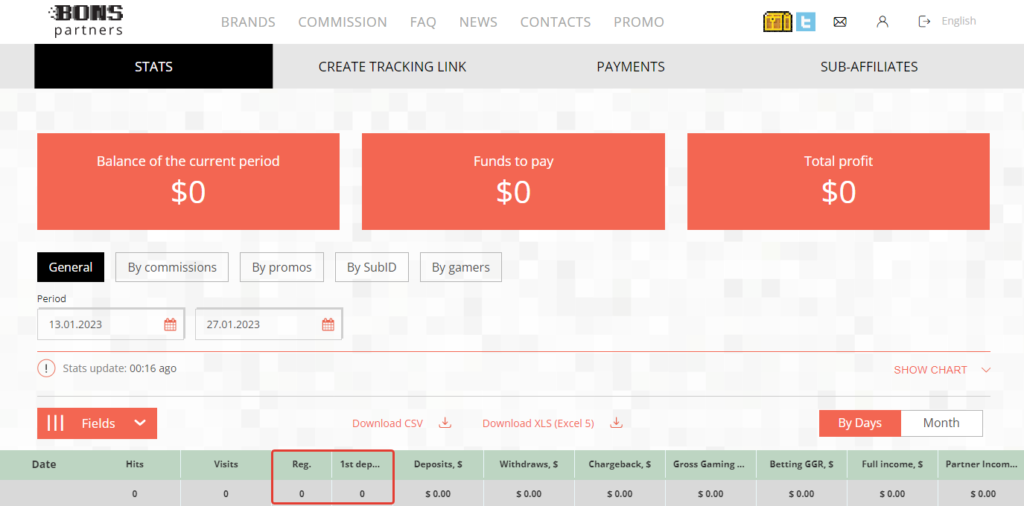
As you can see, a conversion event is being constantly changed. That’s why it is important to track different conversion events separately.
Tip: Don’t ignore conversion statuses and custom conversions tracking. Such stats can make a campaign optimization more accurate.
As you can see, custom conversion tracking is important when you are working with the offers which are bringing different conversion events.
We hope you’ve learned more about custom conversions today.
If you have any questions or need help with the settings, don’t hesitate to contact us via live chat or at support@bemob.com